- Select [Course Activities] on the navbar and choose [Qwickly Attendance]. A new window will open for the Qwickly Attendance tool.
- Select [Attendance] in the menu on the left-hand side of the page to choose a section.
- You can select [Check In] to allow students to check in through a web browser on their own devices
- Select the [Start Check In] button to begin the session.

- Group - The Group option will only appear if you have created Groups in your course.
- Title - Give the session a name.
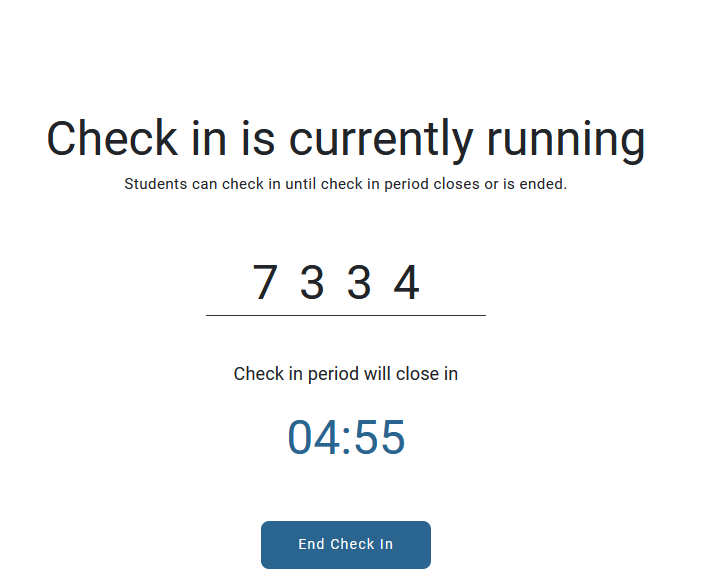
- Selecting the [End Check In] button will end the session and take you back to the previous page.

- A PIN and Timer will only appear if you previously enabled them in Settings - see Set Up Qwickly Attendance.
- A PIN and Timer will only appear if you previously enabled them in Settings - see Set Up Qwickly Attendance.
- The green box at the top of the page will tell you the number of students that checked in.

- Select the [Start Check In] button to begin the session.
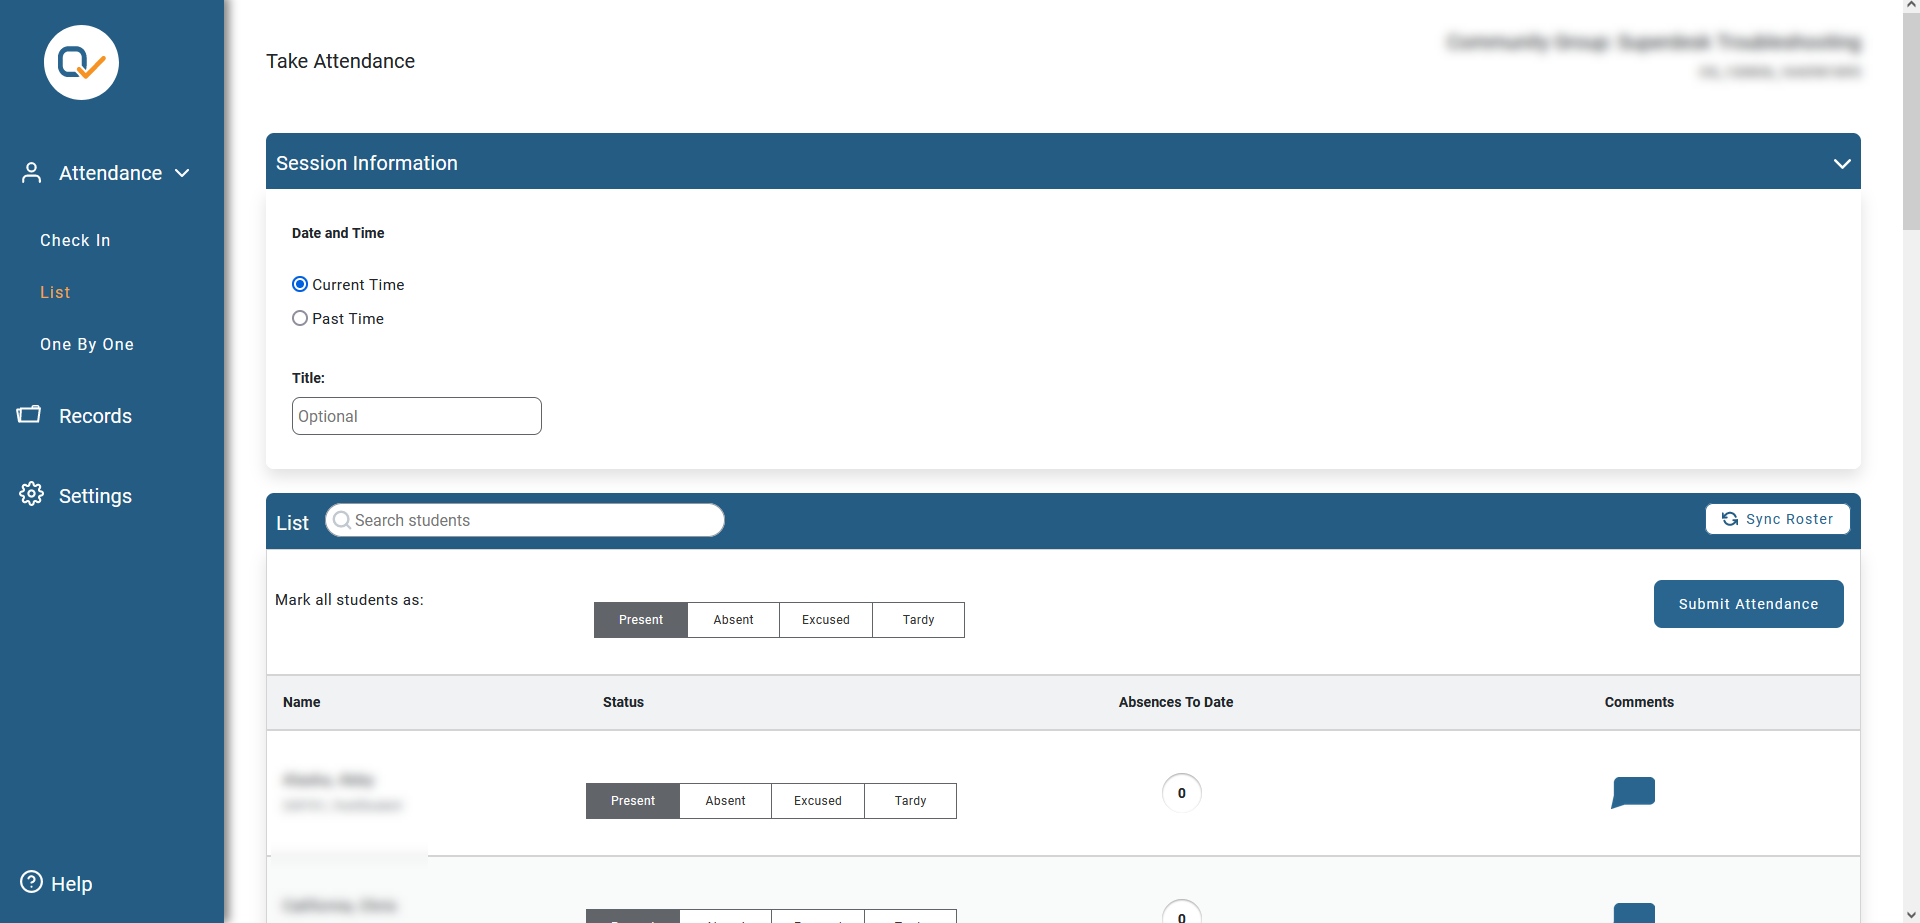
- You can select [List] to view all students in alphabetical order.
- Under Session Information, you can choose the Current Time or enter a Custom Time, and then give the session a Title if desired.
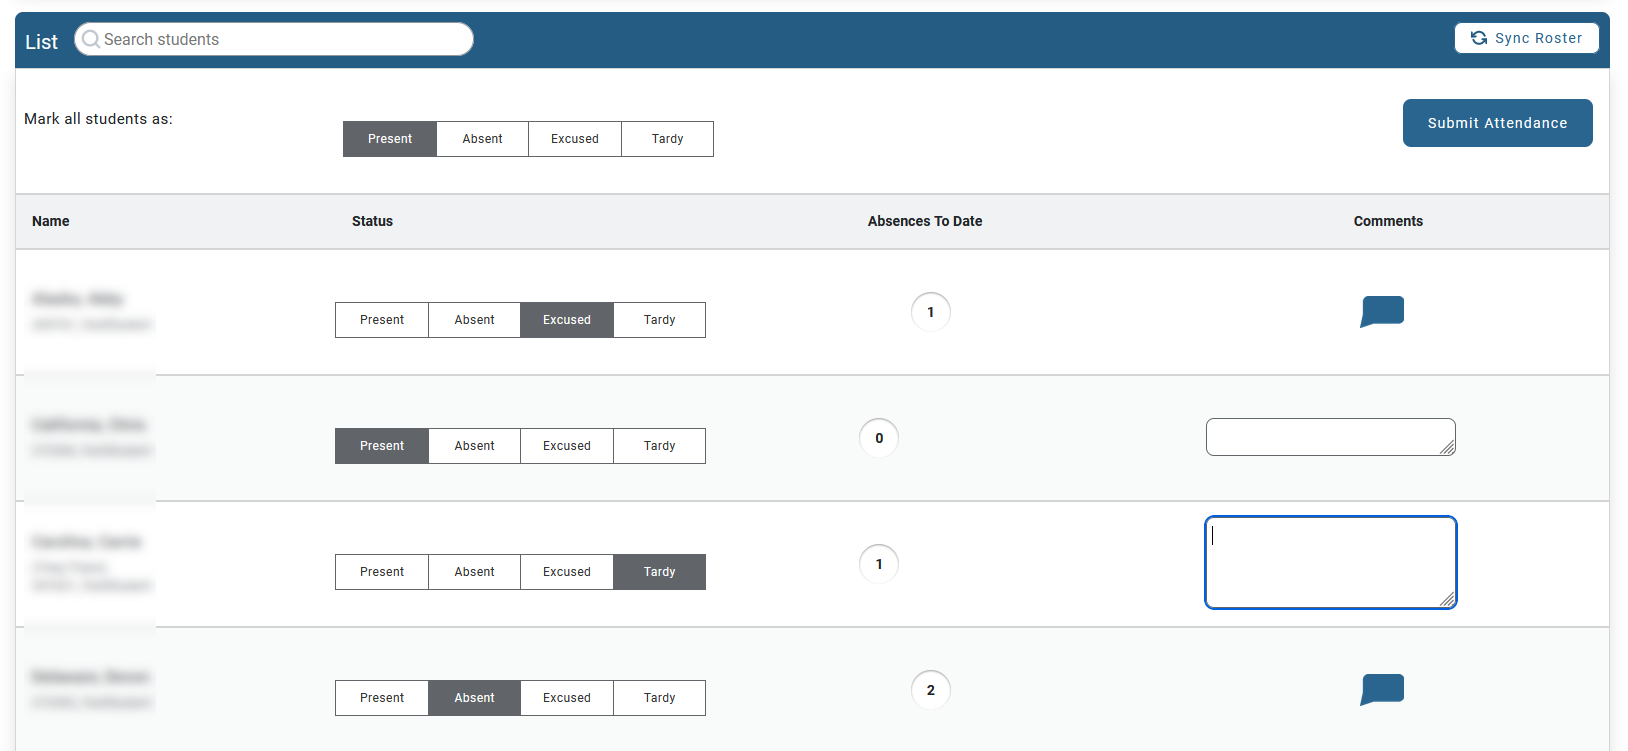
- To take attendance you can freely choose on any status for each student.

- You can also comment on each student's status by selecting the blue chat icon.

- Once you have marked the attendance for all students, select the [Submit Attendance] button at the top of the list.
- Under Session Information, you can choose the Current Time or enter a Custom Time, and then give the session a Title if desired.
- You can select [One By One] to display a single student at a time.
- Under Session Information, you can choose the Current Time or enter a Custom Time, and then give the session a Title if desired.
- To take attendance you can freely choose the status of each student and select the arrows to move from student to student. Select the [Submit Attendance] button at the bottom of the screen once you have marked the attendance for all students.

- Under Session Information, you can choose the Current Time or enter a Custom Time, and then give the session a Title if desired.
-
- New to Online?
- Account Settings
- Frequently Asked Questions
- Faculty Online Teaching Certification (OTC)
- Institutional Memberships
- Multimedia Services
- Online Faculty Handbook
- Online Learning Alliance (OLA)
- Online Teaching & Learning Summit
- Technologies We Support
- Technologist or Designer: Who's the Best to Contact?
- Using the Virtual Teaching Assistance Center (VTAC)
- What is a Lightboard?
- D2L Course Purge
- AI Virtual Conference
- Detecting Artificial Intelligence (A.I.)
- Campus Tours
-
- Semester Start - Instructor Checklist
- Semester Start - Video Series
- Access and Log in to D2L
- Activate a Course
- Add, Delete, or Update Faculty Vitae in myLoneStar
- Add, Delete, or Update Syllabi in myLoneStar
- Archive or Restore a Course
- Brightspace Pulse
- D2L Supported Browsers
- If You Need Access to Another Faculty Member's Class
- New to Online?
- Reconcile Your D2L and iStar Rosters
- Tutoring Services for Your Students
- Verifying the Official Day Roll (ODR)
-
- Add an Attachment to an Assignment
- Annotate Student Submissions
- Anonymous Marking in Assignment Submissions
- Assignment Categories
- Associate an Assessment with a Grade Item
- Associate Assignment Folders with Learning Objectives
- Copy an Assignment
- Create Assignments
- Create a Group Assignment
- Delete Assignments
- Edit an Assignment
- Edit an Assignment Category
- Edit Multiple Assignments Using Bulk Edit
- Grade Assignment Submissions
- Grant Students Special Access on an Assignment
- Graphical Editor & LaTeX
- Previewing Assignments
- Previewing Assignment Folders and Submissions
- Reorder Assignments
- Restore a Deleted Assignment
- Restore Deleted Assignment Submissions
- Restrict Assignment Submission Options
- Set Availability and Due Dates for an Assignment
- Set Release Conditions for an Assignment
- Use Turnitin with Assignments
- Use Quick Eval for Assessment
- Use Video Note
-
-
- Adding Files to a Module
- Add Topics to a Content Module
- Add a YouTube Video to Your Course
- Change and Replace Files
- Copy Course Components (Simple)
- Copy Course Components (Advanced)
- Create a Clickable PDF in an Announcement
- Create a File Using the Content Tool
- Create a Link
- Create a PDF from a Word Document
- Create a Quicklink
- Create Modules and Submodules in Content
- Customize Content Using Replace Strings
- Delete a Module or Topic
- Delete All Content from a Course
- Embed Videos from Academic Video Online to D2L
- File Conversion Tool
- Fix Broken Links
- Graphical Editor & LaTeX
- How to Share Course Materials with Others
- HTML Editor Basics
- HTML Editor - Accessibility Checker
- Import Zipped Content
- My Courses Widget
- Remove Third-Party Integration Content and the Associated Grade Items
- Set Release Conditions for Content Modules and Topics
- Visibility and Completion Options in Content Modules
-
- Accessing Course Materials in D2L
- Add Observers or Advisors to a Course (For Section Builders)
- Add a User to a Course
- Bypass Release Conditions for Observers and Scribes
- Course List by Academic Department
- Customize Your Course Image
- D2L Course Calendar Basics
- D2L Roles
- D2L Supported Browsers
- Edit Dates Using Manage Dates
- Exclude Select Courses From Notifications
- Export Attendance Data
- Export your D2L Calendar to another Calendar Application
- How to Share Course Materials with Others
- LSC Copyright Policy
- Manage Calendar Events
- Merge Course Rosters
- Manage Your Course Files
- Microsoft Teams Widget and Teams FAQNew
- Migrate Student Submission Data Between Courses
- Offset Course Dates using the Manage Dates Tool
- Release Conditions
- Release Condition Types
- Release Conditions - Best Practices
- Set Up or Delete Attendance Registers
- Use Classlist
- Use the Course Selector
- View Course as a Student
-
- Edit Discussion Topic - Properties
- Edit Discussion Topic - Right Panel
- Apply Discussion Forum Restrictions
- Calculation Methods for Assessing Individual Discussion Posts
- Create Discussion Forums and Topics
- Create Private Discussions for Student Journaling
- Copy a Discussion Forum, Topic, Thread, or Post
- Grade a Discussion
- Graphical Editor & LaTeX
- Move Discussion Threads and Replies
- Subscribe to a Discussion to Receive Post Alerts
- Restore a Deleted Discussion Topic
- Use Faculty Quick Eval for Assessment
-
-
- Create a Gradebook with the Grades Setup Wizard
- Difference between a Weighted and Points Gradebooks
- Create a Gradebook Category
- Create a Grade Item
- Create a Bonus Grade Item
- Drop the Lowest Grade
- Create a Selectbox Grade Column
- Set Up a Weighted Gradebook
- Set Up a Formula Grading System
- Bulk Edit and Reorder Items in Grades, Assignments, Quiz and Survey Tools
- Delete a Grade Column
- Restore Deleted Grade Item
- Gradebook Schemes
- Create and Edit Grade Schemes
- Automatic Zeroes for Overdue Submissions
-
-
-
- Respondus 4.0 Guides & Videos
- Format for Importing Multiple Choice Questions into Respondus Campuswide
- Print a D2L Exam with Respondus 4.0
- Publish a Quiz or Question Library from Respondus to D2L
- Retrieve a Quiz from D2L (Retrieve Questions Wizard)
- StudyMate Campus Guides
- Turn Off Auto Numbering In Word
-
- Add YuJa Video to Content Modules
- Add YuJa Video Quiz to Content Modules
- Add a YuJa Video as a Direct Link into D2L
- Create Enhanced Audio Descriptions in YuJa
- Create a YuJa Video Quiz
- Disable Fast Forwarding on a YuJa Video/Playback Quiz
- How to Convert a Webex Recording Link into a YuJa Video Link
- Manage Your YuJa Videos
- Manual Upload or Download from YuJa
- Record with YuJa Software Capture
- Record with YuJa Browser Capture Studio
- Record your iPad screen and upload it to the Yuja Library
- Search in YuJa Using Filter by Location
- YuJa Software Capture for Desktop [Alternate Installer]
- YuJa Tips
- YuJa for Mobile Devices
- Add SmarterMeasure Assessment for EDUC 1300
- Approved Instructional Technologies
- Brainfuse - Online Student Tutoring
- Software Resources for Faculty
-
-
- About the LOR: Shared Faculty Repository
- Add or Edit Optional Metadata for LOR Objects
- Delete an Object from the LOR
- LOR: Change Versions of a Learning Object in Your Course
- LOR: Unhide an Object in the Shared Faculty Repository
- LOR: Update a Learning Object
- Publish to the LOR
- Retrieve Objects from a LOR for Your Class
-
-
- If Students Cannot Access Quiz Through LockDown Browser
- LockDown Browser & Monitor Dashboard - Preparation
- LockDown Browser Autolaunch
- Prepare Your Students for Respondus LockDown Browser and Monitor
- Respondus LockDown Browser & Monitor Dashboard - Settings
- Respondus Monitor Approved Publishers
- Use Respondus Monitor with McGraw-Hill ALEKS
- Use Respondus Monitor with Pearson MyLab
- Proctoring Options for Online Quizzes
- Instructor Live Proctoring with LockDown Browser
- ProctorU Live+
- Submit a Testing Center Request
-
-
-
- Create a Quiz
- Edit Quiz - Quiz Properties
- Edit Quiz - Availability Dates & Conditions
- Edit Quiz - Timing & Display
- Edit Quiz - Attempts & Completion
- Edit Quiz - Evaluation & Feedback
- Delete a Quiz or Exam
- Print a Quiz
- Set Release Conditions for a Quiz
- Respondus LockDown Browser & Monitor Dashboard - Settings
-
-
- Connect a Rubric to an Assignment
- Connect a Rubric to a Discussion Topic
- Connect a Rubric to a Grade Column
- Copy a Rubric
- Setting Up a Rubric
- Edit and Manage Existing Rubrics
- Grade an Assignment with a Rubric
- Grade a Discussion With or Without a Rubric
- Use a Rubric with a Grade Column
- Grade a Written Response Quiz Question with a Rubric
-
- Brightspace Pulse
- Create Student Inactivity Alerts
- Extend Course Access for a Student
- Reconcile Your D2L and iStar Rosters
- Retrieve Withdrawn Student Course Activity Data
- Set Up Email Notifications in D2L
- D2L Student Training
- Use Intelligent Agents for Early Alerts
- View Student Photos-Faculty View
- View Student Photos - Advisor or Student Services View
- Verifying the Midpoint Roll (MDR)
- Work To Do Widget
-
-
- Approved Instructional Technologies
- Add AchieveWorks Personality and Skills (LTI 1.3) to Your D2L Course
- Add Aktiv (CHEM101) 1.3 to Your D2L Course
- Add Beyond Labz to Your D2L Course and Importing a Course Cartridge
- Add Carolina Gateway to Your Course
- Add Cengage to Your Course
- Add Connect4Education Content to Your D2L Course
- Add Electude to Your D2L Course
- Add Evolve 1.3 to Your D2L Course
- Add F.A.Davis to Your D2L Course
- Add Goodheart-Willcox Content to Your D2L Course
- Add Knewton Alta Assignments to Your D2L Course
- Add Labster to Your D2L Course
- Add Macmillan Achieve to Your D2L Course
- Add MyOpenMath to your D2L Course
- Add Odigia Content to Your D2L Course
- Add OER Commons Content to Your D2L Course
- Add OpenStax Assignable to Your Course
- Add Oxford University Press Content to Your D2L Course
- Add Peerceptiv to Your D2L Course
- Add Pivot Interactives to Your D2L Course
- Add SAGE Vantage to Your D2L Course
- Add ScienceInteractive to Your Course
- Add Top Hat to Your D2L Course
- Add True+Way ASL to your D2L Course
- Add uCertify Content to Your D2L Course
- Add VHL Vista Higher Learning Material to Your D2L Course
- Add WileyPlus (LTI 1.3) to Your D2L Course
- Add zyBooks to Your D2L Course
- ExamSoft
- Requesting H5P Content to Your D2L Course
- Use Films On Demand in D2L
- Using ReadSpeaker
- Using Zoom with D2L
Related Articles
Thank you for your feedback!


