This article covers the Evaluation & Feedback panel of the quiz editor, including how to configure point deductions, auto-publish results, gradebook synchronization, and quiz results display options.
The Evaluation & Feedback panel on the right side of the Edit Quiz page is located towards the bottom. Expand it by clicking on [Evaluation & Feedback].

Deduct Points for Incorrect Answers
When the [Deduct points for incorrect answers] box is checked, students will receive negative points for incorrect answers. For each question answered incorrectly, a percentage of the question's point value will be deducted from the student's attempt grade. You can adjust the deduction amount in the percentage box.

Auto-Publish Results
With [Auto-publish attempt results immediately upon completion] turned on, the auto-evaluated attempt results will be published and appear to students.
NOTE: If questions cannot be evaluated automatically (e.g., written response questions), those questions will be automatically scored with a zero until manual evaluation.

Synchronize to Gradebook on Publish
With [Synchronize to grade book on publish] turned on, the student's grade will be automatically published to the gradebook once it has been evaluated.
NOTE: The quiz must be linked to a grade item in the gradebook for this option to be available, otherwise it will be grayed out.

Quiz Results Display
Enable the [Attempt grade] checkbox for students to see their grade for the current quiz attempt.
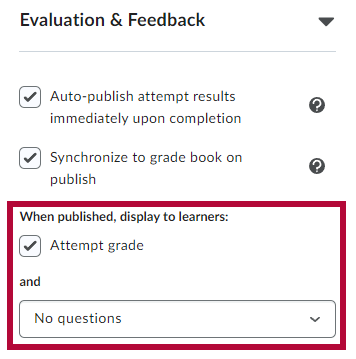
The dropdown menu below lists the options for what students will see when quiz results are published. There are five options available:
- [No questions] — This is the default option.
- [Incorrect questions only, with correct answers]
- [Incorrect questions only, without correct answers]
- [All questions, with correct answers]
- [All questions, without correct answers]

Customize Quiz Results Displays
Clicking on [Customize Quiz Results Displays] will open a new window, allowing you to customize what is displayed when the quiz is submitted.

Quiz Results Display determines how students can view their published quiz attempt results, both immediately following submission and when reviewing their attempt later. Click on [Edit View] to customize the Primary View window.

Primary View
The Primary View is shown to students by default. Additional Views will override the Primary View based on set parameters. Statistic display options for [Display class average] and [Display grade distribution] are also located below.

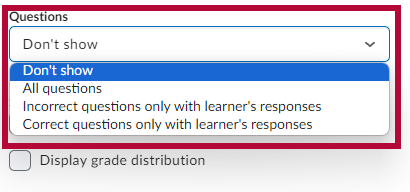
Click the dropdown menu under Questions to change what students see upon submission. There are four options available:
- [Don't Show] any questions to students upon submission.
- Show [All questions] to students upon submission.
- Show [Incorrect questions only with learner's responses].
- Show [Correct questions only with learner's responses].
Additional Views
Click [Additional Views] to override the Primary View based on a date or time elapsed.

Select a Display Date or set the amount of time after submission for when the additional view will come into effect, then define the parameters as you did for the Primary View. Once you have set the parameters, click [Create].

Troubleshooting and Support
If you need additional assistance, contact the IT Service Desk at 281.318.HELP (4357).