The goal of accessible learning is that a person with a disability will obtain the information as fully, equally, and independently as a person without a disability. When a learning setting is accessible, a person with a disability is afforded the opportunity to acquire the same information, engage in the same interactions, and enjoy the same services as a person without a disability in an equally effective and equally integrated manner, with substantially equivalent ease of use.
The best thing you can do to keep your D2L webpages accessible is to use the font size and style provided in the course template. Do not try to change the font typeface or size; this will make it easier to maintain consistency. In addition, check the following accessibility guidelines for each element to make sure that your page is accessible.
Make Headings Accessible
Use Properly Formatted Headings to Structure the Page
Styling text using font size, color, or weight to make them look like headings is not sufficient for screen readers to identify. Instead, heading text needs to be formatted so it is identified as a heading.
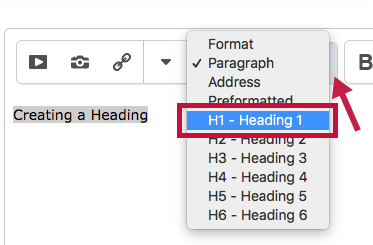
- Highlight the text, and then from the Format menu drop-down on the toolbar, select the heading number.
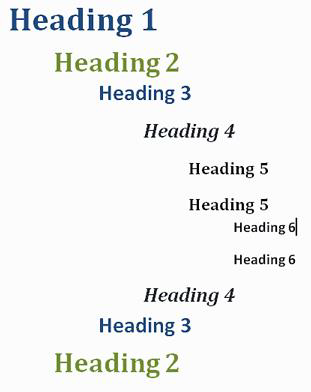
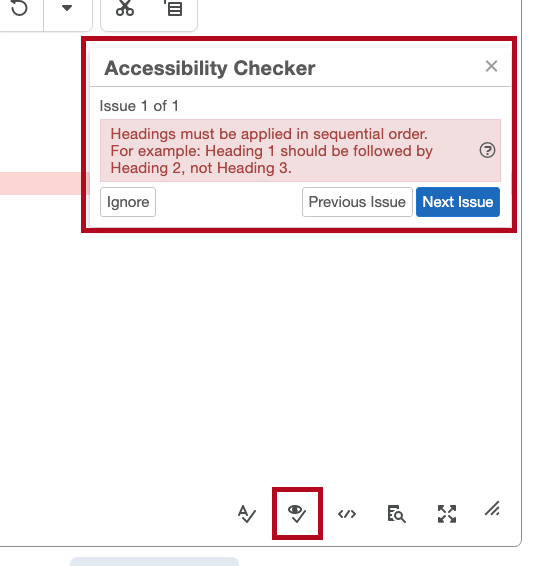
NOTE: In addition to formatting headings as headings, you need to use the headings in the correct order. Headings chunk your content, making it easier for everyone to read. Headings are also a major way of navigating with a screen reader.
- You must use headings in the correct order for them to be useful.
- Headings formatted in the proper order function like an outline for the document.
- Heading 1 is like the title of a book; there is just one per page. Heading 2s are like chapter titles. Heading 3s are sections of those chapters, and so on.
- To make a document accessible, don't skip heading levels.
- See below for a visual display of a possible heading order.
- Headings formatted in the proper order function like an outline for the document.


Make Lists Accessible
Use Properly Formatted Lists
Page formatting for document elements such as lists is read aloud to screen reader users so the content is understood in context.
To format lists:
- Select the content you want to make into a list.
- From the toolbar, click the Unordered List icon if the order doesn't matter, or select the Ordered List option from the drop-down menu if the order does matter.
Make Images and Graphics Accessible
Provide Alternative Text Descriptions for Images and Shapes
Alternative text descriptions of images (alt text) allow screen reader users to benefit from the information being conveyed by an image. (For images that cannot be adequately described in one or two brief sentences of alt text, see Make Complex Images Accessible.)
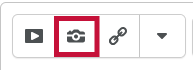
- Place the cursor where you want to insert an image, and then click the Insert image icon from the toolbar. The Add a File window displays.
- Browse to the image location either on your computer or in your course offering files. Select the image file, and then click [Open].
NOTE: To organize your files, click [Choose Destination], select the images folder, and then click [Select a Path]. This action stores your image inside the images folder. If you don't have an images folder, you can create one by clicking the [New Folder] link.
- Click [Add]. The Provide Alternate Text window displays.
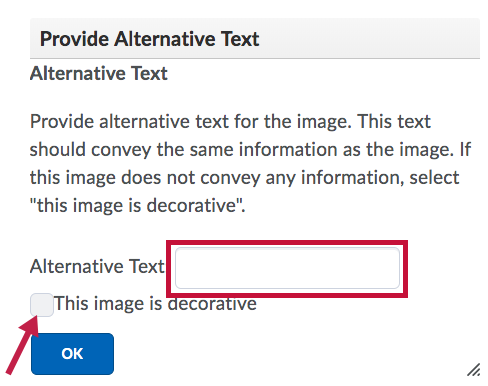
- Type a descriptive text for the image. For example: "Penguins can be found in the South Pole."
- It's important to write a description that conveys why you are including the image on the page. Why is it important? What point does it make?
- If the image is for decorative purposes, select the [This image is decorative] checkbox instead.
- It's important to write a description that conveys why you are including the image on the page. Why is it important? What point does it make?
- Click [OK], and then click [Publish] or [Update] to save your file.

Make Links Accessible
Write Meaningful Link Text That Indicates the Link's Destination
Links are a major method of navigating for everyone, but especially screen reader users. If the links are embedded into meaningful text, they are much more useful.
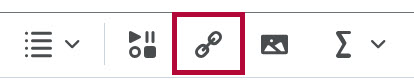
- From the toolbar, click the Insert Quicklink icon.
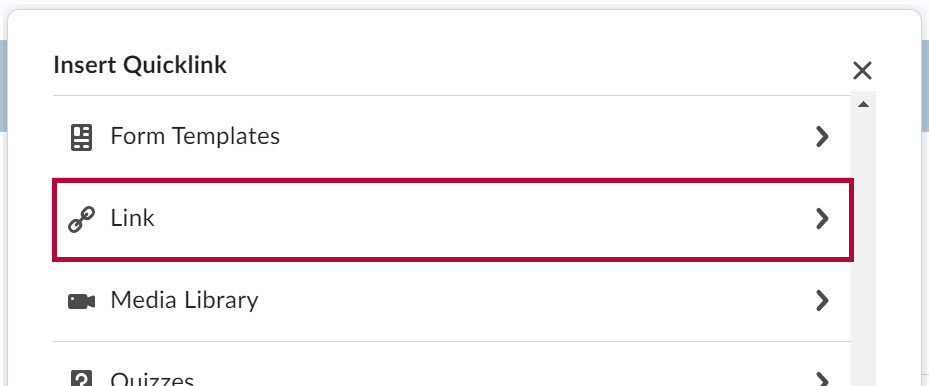
- Select [Link] in the Insert Quicklink window.
- Type or paste the link (web address).
- Enter text that describes the link's destination in the Text field.
- For example, if the link takes you to the Portland Community College website, use "Portland Community College website" for a meaningful description instead of the URL "www.pcc.edu" or "click here," neither of which is descriptive.
- Select [New Window] in the Open in section.
- Type or paste the link (web address).
- Click [Insert].
- Click [Publish] or [Update] to save your changes.


Make Tables Accessible
Create Data Tables with Column Headers
Designating column or row headers in a table is essential for screen reader users to understand how the information is laid out.
- Put your cursor in one of the cells you want to mark up as a table header.
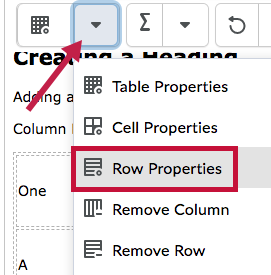
- Click the drop-down menu next to the Table icon in the toolbar, and select [Row Properties]. The Row Properties window displays.
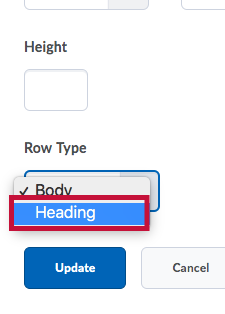
- In the Row Type field, choose Heading from the drop-down list.
- When you are done, click [Update]. You will know you have successfully changed the row to table headers because the look of the table cells will change.


Add a Caption to Your Table
- Put your cursor in one of the table cells.
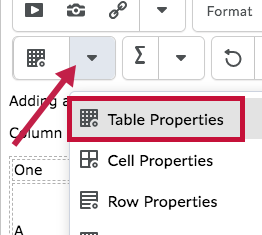
- Click the drop-down menu next to the Table icon in the toolbar and select [Table Properties].
- Scroll to the bottom of the window and check the box next to [Include Caption].
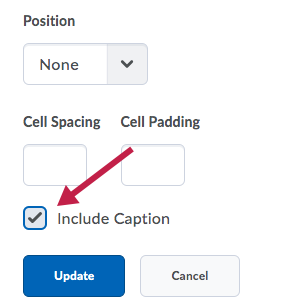
A text box where you can type a caption for the table will appear above the table. Click into that text box to type your caption.


Ensure a Proper Reading Order in Tables
Screen readers read tables from left to right, top to bottom, one cell at a time (no repeats). Read your table left to right, top to bottom (never repeating a cell). Does it make sense? A screen reader reads tables in this way.
Merged, nested, and split cells change the reading order of tables. Make sure you construct your table in a way that accommodates good reading order.
See Make HTML Tables More Accessible for more tips on making your table accessible.
Color Use in Web Pages
Don't Use Color Alone to Convey Meaning
Don't use color alone to make a distinction, to make a comparison, or to set something apart from the rest of the document. If you categorize something by color alone, those who are color blind or have other visual disabilities will not be able to benefit from that information.
Use Sufficient Color Contrast
Make sure there is enough contrast between the font color and the background color. Without sufficient color contrast, people who are color blind or have other visual disabilities will not be able to benefit from that information.
Check Color Contrast with D2L's Color Tool
- Go to the module and click on the page you want to check the color contrast.
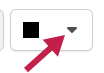
- Select the text whose color you want to change and click the drop-down menu next to the Color icon in the toolbar.
- Select the color, then click [Save].
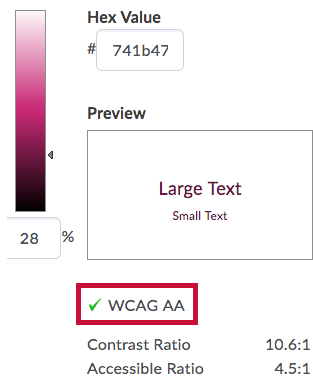

NOTE: When picking a color for your text in D2L, make sure you choose a color that registers with a green checkmark for WCAG AA in the Select a Color window.
For a stand-alone tool that can test things in many applications (not just D2L), try the Color Contrast Analyser Tool.
How to Install and Use the Colour Contrast Analyser
- Download and install the Color Contrast Analyser Tool.
- Open the Color Contrast Analyser application.
- Click the Foreground eyedropper tool, hover over and click the foreground color (usually text) to select it.
- Click the Background eyedropper tool, hover over and click the background color.
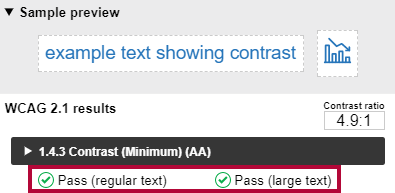
- If you have a 12pt font you are testing for color contrast, you must get an (AA) Pass for regular text.
If you have a font larger than that, you must get an (AA) Pass for large text.

Colour Analyser Tips
- Make sure you are in the Result — Luminosity mode, not the contrast result for color blindness.
- Results are shown for regular size (approximately 12px) font and large text (18px or larger).
- LSC's standards are to reach a pass in the AA standards. Don't worry if you fail the AAA standards, though you might want to consider something with more contrast.
- Avoid these color combinations:
- Red | Black
- Blue | Yellow
- Red | Green
Use of Flashing or Blinking Content
Eliminate Flashing or Blinking Content
If you must use flashing or blinking content, limit that content to no more than 3 flashes per second. Any flashing or blinking content (especially content in red) can cause seizures in people with photosensitive epilepsy as well as other photosensitive seizure disorders, so this content should be used very rarely if at all. Pages that do contain flashing content should limit the flashing to no more than three flashes per second and should not use fully saturated reds in the content.
If you have a video containing a scene involving very bright lightning flashes (or other scenes with flashes), edit the video so the lightning doesn't flash more than three times in any one-second period.
Make Interactive Elements Accessible
We recommend the D2L quiz tool for creating forms. If you link out to an outside web-based form, check its reading order and how well it works with a screen reader.
Check the Reading Order of Forms
- The reading order of a form is important to those who are blind or physically disabled.
- To check the reading order of a form, try tabbing through the form. Does the cursor land in the form fields in the expected order? If not, you need to edit the order of the form fields.
- If you are just making questions and leaving a space for answers instead of formatting your document as an actual form, make sure it is clear what you want the students to do. For example, if you want students to fill in their responses to your questions below the question, write instructions so it's obvious to someone using a screen reader.
Label Form Fields and Buttons
If you are using the D2L quiz format as your form, you can be assured that the form fields and buttons are clearly labeled.
- In order for a blind person to be able to fill out a form, the form needs to be electronic and the fields need to be associated with their corresponding labels.
- Make sure the form fields are labeled so the screen reader tells the user what information to fill into the form fields.
Ensure That Any Action That Uses a Mouse Can Also Be Completed by a Keyboard
People with carpal tunnel and other mobility issues often cannot use a mouse. While there are more and more input devices and software options, such as speech-to-text software and touchpads, keyboard accessibility remains an important input format for many assistive technologies.
- Whatever the operation or behavior, make sure a mouse is not required.
- Try navigating the web page without a mouse. Use the following keyboard commands to navigate and interact with the web page and all of its content:
- Tab
- Arrow keys
- Enter
- Spacebar
- Tab
- Keyboard commands that are clearly provided (and common operating system and browser keyboard commands) may also be used.
- Ask yourself, "Could I complete this course without using a mouse?"
Test Interactive Learning Objects with a Screen Reader
Even if something is keyboard accessible, objects, buttons, or input fields may not be properly labeled. Improper labeling would make the learning object inaccessible to someone using a screen reader.
- If the interactive object or behavior on the webpage has passed the keyboard test above, try it out with a screen reader.
- Does the screen reader read the button labels?
- Are any changes made to the webpage by scripts or user interaction made understandable to the blind or low-vision user?
- Does the screen reader read the button labels?
- If you don't know how to test with a screen reader, please contact VTAC or your instructional designer.
Make Math and Science Equations Accessible
Use MathML to Write Math and Science Equations, Formulas, and Notation on a Webpage
The D2L equation editor outputs MathML, and you can publish Microsoft Word with the MathType plugin to MathML. See Make Math-Science Resources Accessible.
Video: How to use the D2L equation editor
Additional Guidelines for Accessibility
- Caption video and transcribe audio.
- Don't require students to use inaccessible software applications. Consider the software applications you require students to use.
- Is the software fully accessible?
- Can you separate the task or outcome from the application and let students use whatever works best for them?
- Optional materials and resources should include widely accessible options.
Run an Automated Accessibility Checker
Use the Built-In D2L Accessibility Checker
There are a few different web page accessibility checkers. To begin with, there is a built-in accessibility checker in the HTML Editor. When you click the Accessibility Checker, a window will pop up and enumerate the accessibility issues.
Use the WebAIM WAVE Accessibility Checker
In order to check web pages that require a log-in, such as D2L, you can also use the browser-based WebAIM WAVE accessibility toolbar add-on for the Firefox and Chrome browsers.
- Download & Install the WAVE toolbar.
- Open the D2L page in its own window by clicking on the open in a new window icon.
- Right-click the page in the new window, and select [WAVE], then choose [Errors, Features, and Alerts] to see what accessibility errors you have on the page.
- Error icons in green, red, yellow, and blue will appear on the page. If you hover over an error icon, more information on the error will appear.
- Return to the original D2L page, and open the D2L editor to repair the problems you found.
There's a lot more you can do with this toolbar, but this is how you do an accessibility error check with it. Check out this webpage and video: Identifying Web Accessibility Issues using WAVE tool.
You might also like to check out Jim Thatcher's Favelets for Checking Web Accessibility.