Enrolling students in groups
Students are enrolled in Groups based on the enrollment options selected on the New Category page. See directions for how to use New Category to create groups in the article Create Groups. You will use the Enroll Users page to:
- Manually enroll students in groups if you selected [# of Groups – No Auto Enrollments].
- Manually change which group a student is enrolled in.
- Add students who enrolled late to a course if [Auto Enroll New Users] is not selected.
- Search for students who have not been assigned to a group.
Modify or add enrollment
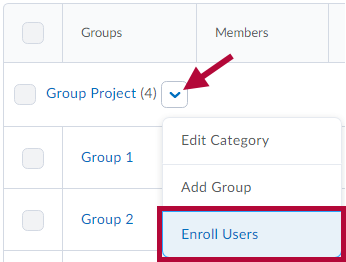
- On the Manage Groups page, click [Enroll Users] from the context menu of the category that contains the group (or groups) you want to enroll a student in.
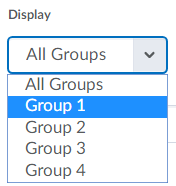
- Select the group you want from the Display drop-down list.
- Enter information in the [Search For...] field to find a specific student. You can do an empty Search to find all students.
TIP: Click [Show Search Options] and select the [Not Enrolled] search option to find students that still need to be added to a group. If already selected, uncheck the [Enrolled] search option and Search again to list only those students who are not enrolled in a group. - Select the [Checkboxes] beside students' names to add them to groups. Clear the [Checkboxes] to unenroll students from groups.
- Click [Save].
TIP: Manually enrolling students allows you to exceed the enrollment limit for a group.


Setting up self-enrollment in groups
Self-enrollment allows students to enroll in groups on their own. Use this option when you want students to have the freedom to choose their own group members or to be a part of a group on a topic that interests them.
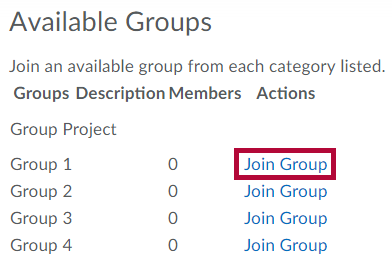
Students can self-enroll in groups by clicking [Collaboration] on the navbar and choosing [Groups], then clicking the [View Available Groups] button. They can then click the [Join Group] link next to the groups they would like to join.
TIP: Clicking on the total listed in the Members column opens the Group Members pop-up containing a list of current group members.
Set up self-enrollment groups
- On the Manage Groups page, click [New Category].
- Enter a Category Name and Description.
- Select [Groups of # - Self Enrollment], [# of Groups – Self Enrollment], or [# of Groups, Capacity of # - Self Enrollment] from the Enrollment Type drop-down list.
- Depending on the chosen Enrollment Type, enter the Number of Groups to create, or the Number of Users per group.
- Select [Set Up Discussion Areas] if you want to associate discussion areas with the groups in the category.
- Lockers have been disabled for our environment.
- Select [Set Up Assignment Submission Folders] if you want to associate an assignment folder with the groups in the category.
- Select [Set Up Discussion Areas] if you want to associate discussion areas with the groups in the category.
- Click [Save].